Tuesday, February 28, 2006

Tabletop Bug

How about having a robotic bug that runs around your desk?


This is a desktop line following robot, created by Elm Chan.
Click HERE to visit his site that has details about this robot


This robot is powered by 2 coin batteries, using an ATmega8 (Atmel) microcontroller with 6 photoreflectors as its "eyes". According to the maker, it weighs only 15g!

The robot uses PID (without the I) for its line following function! Cool!


Ideas are rolling.... how about drawing a black line leading straight to your boss desk, with an emoticon drawn on a yellow memo pad that is being sticked onto the back of this bug? ;p

Monday, February 27, 2006

RGB LED


Picture taken from LINK


Specs from datasheet

3-in-1 LED. Red, Green Blue, or any other color formed by combining the colors. This can be done by pulsing individual color with PWM, or just switching it on and off using traditional ways (normal switch, or transistors).

This is the type of LED that's used in the previous post.

Nowadays, mood lights are getting common. How about making one?

Sunday, February 26, 2006

LED Cubes

What happens when you arrange LEDs into a 3D grid?


This is how nice it can be! RGB LEDs individually controlled to form different patterns.


This is The Cubatron, an electronic yet artistic project created by the Network Wizards.


The individual light is actually a RGB LED hidden in a normal ping pong ball.


The RGB LED's color is controlled by a PIC12F629 microcontroller, which is instructed through serial means from another microcontroller.

The overall effect of the LED cube actually looks somewhat similar to a 3D display, allowing one to have 3D visual effects on whatever that is being displayed.


This is another LED cube from LINK

Now here is something NOT to be missed: a cube made from 1000 white LEDs!


This is the masterpiece created by James Clar. You MUST look at his site where he has a movie of it running the famous pong game, in 3D!! LINK: 3D Display Cube White.

Possibilities are unlimited! How about a brick game on the LED cube? Nokia's snake game? or classic Mario game running around in the cube?

Here are some other cubes that James Clar had made:
3D Display Cube V3
3D Display Cude V1

Here is another very good LED cube site: Chris Lomont's LED Cube In his site, he documented the making of his LED cube along with many interesting video clips. Another MUST visit site.

What are you waiting for? Go make one now!

Saturday, February 25, 2006

LCD HD44780

One of my old toy that was dug out from the dusty store...


16x2 LCD Character Module (HD44780 based) controlled by a PIC16F84A (behind the LCD) showing a man walking animation.

Here are some sites that can give you more information:

How to control a HD44780 based LCD (with code)
PIC to LCD Character Modules
Interfacing LCD to PIC

Here is a free program that allows you to display various PC status, including winAmp visualisations, on the LCD!
LINK: LCD Smartie

How about making a USB based LCD display to plug-n-play into your laptop/PC and display vital stats/currently playing MP3 titles? =p

Friday, February 24, 2006

Paper CD Case

How about making a paper CD case for your gift CD? ;p

Here is a site that allows you to type the artist and tracks to generate an Origami of the CD case. LINK: paper cd case


Folding instructions taken from paper cd case.

Or you may like to download a PDF from Thomas Hull.

Maybe this can be another innovative idea for fund raising? or another save-the-earth project for reusing waste paper? =p

Thursday, February 23, 2006

Nokia 3310 LCD

What do you normally do with your old Nokia mobile phones? Trade them in?

Make them into fun toys!


This a Nokia 3310 b/w LCD display. Actually I do not have an old Nokia phone to remove this from... I bought this display from a ah-beng handphone shop. =)


The LCD is controlled by a PIC16F84A, using I2C. The PIC is unable to hold all the data needed for the display, so I have to store the display data in a EEPROM (24C256) where the PIC will retieve the data and dump it onto the LCD.

These are not my inventions, they were learnt from kind and generous people who are willing to share their findings:

PCD8544 Based Displays

PICC Nokia Display Routines
EEPROM to Nokia LCD - PPIC Routines
Nokia 3310 LCD Library

Cheers for open source learning!

This is something out of the blue..
Nokia Display on Parallel Port

Here is a LINK for the datasheet of the controller that comes with the LCD: PCD8544
Here is a LINK for the datasheet of the EEPROM 24C256


Pinout of the LCD display (you can ZOOM in using any friendly software to see the small wordings). Taken from LINK.

If you are thinking, what about color LCD, here they are!


Nokia Color LCD, taken from LiQuiD-MP3

How about a dynamic photo display made from color LCD as a unique gift? =)

Wednesday, February 22, 2006

LED Throwies

A creative way of using LEDs as artistic light source.
LINK for how to make one.


These are works of the Graffiti Research Lab a division of the Eyebeam R&D OpenLab


The basic idea is to light up a LED using a coin battery. If you add a magnet to it, you can throw it to a metallic surface and expect it to stay there. It will look impressive when a group does it, as below:


Looks fun, a good way to decorate the bare boring metallic wall, and a good way to exhaust coin batteries.

Environmental concern: What will happen to Li-ion coin batteries when they are left on the street wall, exposed to weather elements?

Tuesday, February 21, 2006

TileToy

An open-source fun toy!


From http://www.tiletoy.org/
or blog http://tiletoy.blogspot.com/

"TileToy is a modular, electronic game prototype for tangible LED game tiles. TileToy brings the flexibility inherent in digital software to a physical tile that people can touch and interact with."


"By arranging the electronic tiles, players can engage themselves in various kinds of game play, ranging from fast-paced arcade style games to puzzle an learning games."


Detailed plans on how to make one is available on their site. It is really good to see such projects being placed on the Internet, sharing with everyone in the world. Good sharing spirit! Hope to see more of such projects made available.

Grab the components and your soldering kit to make one now!

Monday, February 20, 2006

HP Omnibook XE3 Spring Cleaning

The ventilation slots on my HP Omnibook XE3 is choked with dust (just like any other fan, which accumulates dust over time), so there is a need for me to disassemble it for spring cleaning. Without doing so, the laptop will not have good air circulation, which is vital for cooling itself down before having a fever. This laptop has already start to perform full thermal shutdown without any warning. =x

The disassembly process was highly enlightened by LINK Thanks to Greg who had created that friendly website to share his knowledge and experience.

After understanding advices from Greg's site,
it's MY turn =)


Laptop lying on operation table, with organs exposed.


The boxy thing on the right is the air circulation unit. This entire laptop has only this boxy thing to get rid of heat!


This is how the boxy thing looks like when flipped over: there is a fan.


Remove the metal cover to expose the head sinks... it's choked with dust!


Look at the amount of dust ~ (2001 to 2005, 4 years)
This is only place for air in/out and it's choked with dust! No wonder this laptop can overheat so easily.


The head of the processor chip is very dry, will not form a good heat transfer contact with the heat sink when mounted.


Apply "toothpaste" (heat sink compound) so as to form a contact between the head and the heat sink, to allow maximum heat transfer.

Everything is back to normal again after this spring cleaning. =)

It does not cost me a single cent for such a cleaning action, but it might cost me some repair fees if I bring it to HP Care.

LED Flasher

This is a 4 component small LED flasher, using a 555 IC as pulse generator. It can be easily constructed out of common components, and has a wide variety of applications.


Here is the circuit diagram.


These are the 5 components. You may skip the IC holder if you are tough.


This is the size of the flasher when placed held.


Components held by a small vice to aid construction.


Completed LED flashers, front view.


Completed LED flashers, back view.

Sunday, February 19, 2006

SSOP20 -> DIP20 Conversion

simingx made these for a friend:


well, I think the primary objective of this is to convert the hard-to-interface SSOP20 SMD legs into friendly DIP20 interface.

simingx: "I Love SMD!"

USB PPM Interface for Windows in SMT

simingx made this USB PPM Interface for Windows in SMT

It's a device that allows you to use your rc transmitter as a joystick in Windows so that you can play those simulators with your rc transmitter. (use rc transmitter as joystick!? cool~)

Now, what are simulators? see http://home.introweb.nl/~erics/fms/ or http://www.aerofly.de


This is his populated SMD circuit board, with a mini USB Type B connector.

I think he must have gone mad after making this, because he keeps telling me "I Love SMD!"

GTP USB Lite PIC Programmer

Every PIC user knows that a good PIC programmer is very important. There are tons of websites out there trying to tell you how to make a programmer, buy some DIY programmer kit set, or buy a ready made programmer. These ranges from the most simple parallel port no component programmer, to complicated USB programmers with USB->Serial converters.

This is not another site to promote another programmer, but this site will show you that a particular programmer has been made, in full working condition, and ready to be adopted if you are interested in it.

GTP USB Lite is a simple USB based PIC programmer that is capable of programming almost any type of PIC till date, with good software support (winpic800) on the PC side.

This is the website that motivates me into making a GTP USB Lite programmer. http://miarroba.com/foros/ver.php?foroid=59905&temaid=3558103

Yes, that site is written in Spanish. You may like to use online translator, eg Babel Fish to translate it from Spanish to English, or any other language that you like.

The component count for this programmer is so low for such a good programmer that it's worth a laugh. This programmer is highly recommended for anyone who is using the PIC, especially to students/enthusiast who normally has a low budget.

This is the software that should be used with this programmer (winpic800). http://perso.wanadoo.es/siscobf/winpic800.htm

However, my programmer does not seem to work with it, till I try using the older version of 3.55b. I had uploaded the older version HERE. If anyone is able to let this programmer work with the latest winpic800, please update me too.

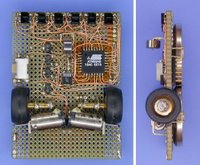
As I ran out of veroboard, all the components have to be squeezed and mostly soldered from end to end. Students who are going to be graded, please do not follow this style. It's only meant for poor and lazy enthusiast like me.


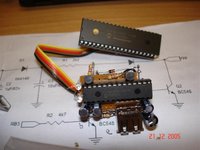
The programmer is at the bottom, with the 18F2550 holding the firmware. The 18F4550 on the top is the target PIC to be programmed. Again, it's no frill - no ZIF sockets here.


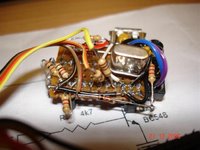
Ran out of half size crystal, had to use a fat one instead. Close up shot, showing how messy the work is. However, it works =) Kids, do not follow!


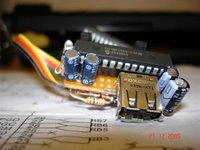
The 18F2550 is a free sample obtained from Microchip. Therefore the most expensive component on this programmer is the USB connector!

Point to note: the firmware has to be programmed into the 18F2550 using another programmer (since your current programmer is still under construction) so please make sure you have access to another programmer, or have friendly friends who can help you to program the firmware into the 18F2550.

By the way, if you are wondering why a Type A USB connector is being used here instead of a Type B, yes, you are right: Type B should be used instead. The simple reason is, I had ran out of Type B connectors! =p

1st post on ali3nworld


welcomed!
this is the 1st post on the newly renovated site: ali3nworld.